Sunday, 28 April 2013

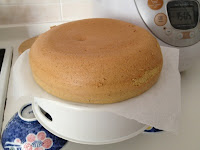
Rice Cooker Golden Butter Sponge Cake


Appliances:
Rice cooker with "cake' function
Electric mixer

Ingredients:
4 eggs, separated, room temperature
100g fine sugar

50g milk, room temperature
50g butter, melted

100g all purpose flour
1 tsp baking powder

Direction:

1. Mix flour and baking powder using a hand whisk. Set aside.


2. Place butter and milk in a heat resistant ware.  Melt the butter in a rice cooker using 'Keep Warm' mode for 10  minutes. And continue to let the butter milk mixture sits in the rice cooker for 10 ~ 20 minutes. It is acceptable if the butter does not totally melted, as long as it is soft, its acceptable.
 
3. Lightly coat the rice cooker pot with butter or oil.

4. Beat egg whites in a clean and grease free mixing bowl at high speed using an electric mixer till frothy, about 3 minutes.


5. Reduce the mixer speed to low and add in the sugar in three lots. When the sugar is well incorporated to the batter, adjust the mixer speed to high, and beat the egg white batter for about 3 ~5 minutes, or till stiff peaks formed.


6. Add in egg yolks, one at a time, to the egg white batter and mix well.


7. Preheat the rice cooker by using the 'Quick Cook' function for 5 minutes. This helps to give the cake a golden crust.

8. Add in the flour mixture, one tablespoon at a time, to the batter using the electric mixer. Stop mixing once no flour can be seen.

9. Finally, add in the butter milk mixture, make sure the temperature is not hot, to the batter. Use the electric mixer to do the mixing.


9. Pour the well mixed batter into the rice cooker. Lightly tap the pot to remove any trapped air within he batter.


10. Start the baking process by selecting the 'Cake' function. This process will take about 40 minutes. Try not to open the lid while baking.

11. When the baking process is over, place a sheet of baking paper and a steamer in the pot to help you invert out the cake to cool.


12. Cool before serving :)


By taking about 1/3 of the batter mixed with 1 tsp cocoa powder paste, you can bake a Zebra cake. While pouring the batter into the rice cooker pot, alternate between butter and Choco batter. Just add the batters to the centre of the pot, overlapping each other, forming a concentric circles :)


Thursday, 25 April 2013

Japanese Sweet Omelette (Tamagoyaki)

Ingredients:
4 eggs
55ml Dashi stock
10g sugar
1 tsp mirin
1/2 tsp light soya sauce

Directions:
1. Beat eggs in a bowl; whisk in Dashi, sugar, mirin and light soya sauce. Whisk till all the sugar dissolve.

2. Heat up the Happycall pan using medium heat. Pour in oil to lightly coat the pan.

3. When the pan is hot, pour in the egg mixture and swirl the pan to enable it to form a thin egg layer. Close the pan lid but not locking it. 

4. When the bottom of the egg starts to harden, but the surface still a bit wet, use 2 spatulas to help you roll up the omelette from one end to another.

5. Push the egg roll back to the starting end, and pour in another batch of egg mixture. Allow the raw egg mixture to 'connect' to the cooked egg roll.

6. When the bottom of the second batch of egg mixture begins to harden, roll up the omelette. Repeat the process till the entire egg mixture use up.

7. Allow the omelette to cool down before cutting into desire thickness to be placed on sushi :)

Click here to see the recipe for sushi bean skin


Sushi Bean Skin


Ingredients:
10 soya bean puffs (about 120g)
4 tbsp light soya sauce
4 tbsp mirin
3 tbsp sugar
~200g water

Direction:
1. Use a chopstick to roll over the tofu puff a few times.


2. Blanch all the tofu puff in hot water to remove the excess oil. Rinse a few times with cold water.


3. Pour all the seasoning into a pot and bring the mixture into a boil.


4. Put all the tofu puffs into the hot mixture and let them heat in low heat till soft.


5. Keep the seasoned tofu puffs in a container with the syrup and store in a fridge till you needed.
Slit a small opening at one end and fill it with sushi rice.


Friday, 12 April 2013

Rice Cooker Pandan Muscovado Chiffon Cake


Yield: one 21cm round cake

Appliance: Rice cooker with "cake" function

Ingredients:
90g All purpose flour
1/2 tsp double action baking powder

4 egg yolks, room temperature
45g Muscovado or brown sugar
30g rice bran or vegetable oil
40g trim milk, room temperature
1x 40cm pandan leaf, cut into small pcs


4 egg whites, room temperature
40g muscovado or brown sugar

Directions:

1. Mix all purpose flour and double action baking powder together. Set aside.

2. Mix egg yolks, Muscovado sugar, coconut milk, rice bran oil, and pandan leaf, using an electric food processor or blender.


4. Pour the mixture into a mixing bowl and sieve in the flour mixture from (1). Use hand whisk to mix. Try not to over stir the mixture.

5. In a separate clean and oil-free mixing bowl, whip the egg white for about 1 minute at high speed or till soft peaks formed.

6. Add in the 40g Muscovado sugar and cream of tartar to the egg white, and whip at low speed till well combined.


7. Whip at high speed for about 2 minutes or till stiff peaks form. The egg white will become smooth and shiny.

8. Lightly coat the inner pot of the rice cooker with butter.
Preheat your rice cooker using 'Quick' mode for about 5 minutes. This will help to give the cake a golden outer crust later.

9. Scoop 1/3 of the whipped egg white to mix with the yolk mixture in (4).


10. Pour the mixture in (9) into the remaining whipped egg white and mix well.
 
11. Pour the batter into the inner pot of the rice cooker. Take out the pot and lightly tap it, to get rid of trapped air and even out the surface.


12. Start the baking by pressing the 'cake' mode of the rice cooker. The baking will take about 40 minutes to complete.


13. When the baking cycle has completed, place the plastic steamer into the pot and invert the pot.


14. Let the cake cool down before cutting to serve :)


Thursday, 11 April 2013

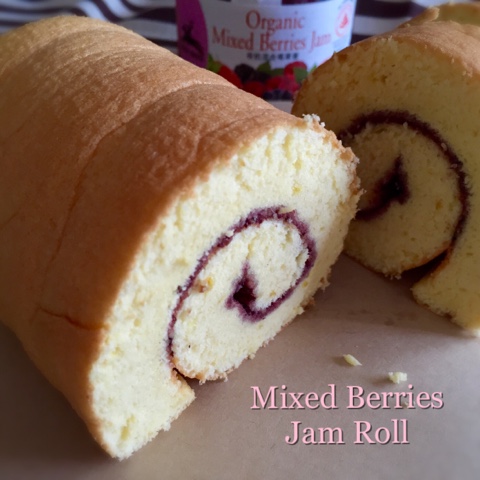
Mixed Berries Jam Roll 果酱蛋糕卷

I found this low fat recipe about 3 years ago. The author claimed a few awards based on this recipe. However, it's a pity that I forgot to save the link :(
The recipe has no added fat, yet it yielded a soft and springy cake. And most importantly, the cake never crack when rolled up, and keep the soft golden crust intact. 
The jam make it an ideal filling for our hot weather - no hurry to store in the fridge. You can leave it room temperature, though a cooler cake tasted nicer.
Although this is a low fat cake, it still has a relatively high sugar content, so it's better to eat in moderation ^^


Yield: about 6 to 7 servings

Ingredients 
All ingredients in room temperature 
Using 55g eggs

3 egg yolks 蛋黄

30g water 水
60g fine sugar 细砂糖
1/8 tsp salt 盐
1/2 tsp vanilla extract 香草精
1/8 tsp lemon zest 柠檬泥

75g cake flour 低筋面粉
1/4 tsp baking powder 泡打粉

3 egg white 蛋白
1/4 tsp lemon juice 柠檬汁
30g fine sugar 细砂糖

3 tbsp fruit jam, lightly stir to facilitate spreading 果酱


Directions
1. Line a 28 x 19 x 2 cm baking pan with parchment paper; grease the paper and set aside.

2. Mix cake flour with baking powder in a bowl. Set aside.


3. In a large bowl, beat egg yolks and water on high speed for 5 minutes or until thick and pale in colour. 


4. Gradually beat in 60g sugar. Then followed by salt, vanilla extract and lemon zest.


5. Sift in the flour mixture from (2) gradually to the yolk mixture and mix well (batter will be very thick).


6. Place egg whites in a separate grease-free and clean large mixing bowl. Beat egg whites and lemon juice on medium speed until frothy. 

Gradually add in the 30g fine sugar and beat at medium high speed till almost stiff peak state.


7. Fold the meringue to the batter in (5), until it forms a smooth batter.


8. Pour the batter onto the lined baking tray and spread evenly.


9. Bake the batter in a preheated oven at 180°C for 15 to 18 minutes or until cake springs back when lightly touched.


10. Remove from oven and cool for 5 minutes. Invert onto a tea towel or steamer cloth. Gently peel off parchment paper. Roll up cake in the towel in jelly-roll style, starting with a short side. Cool completely on a wire rack. 


Lift the cake out of the tray and rest for 5 minutes.

Pull down the parchment paper.

Place the steamer's cloth over the cake.

Invert the cake over.

Remove the parchment paper.

Roll up the cake with the aid of the steamer's cloth.

Allow the cake to cool down completely with the steamer's cloth still wrapped. The cloth prevents the cake from drying up. If you use parchment paper, the cake may lose the outer golden crust.


11. Unroll cake; spread evenly with jam. Roll up and let it stays for about 30 minutes to set its shape.

Stir the jam to loosen up the gel


12. Cut into desired size and serve. The cake tasted better after chilling :)