Thursday, 30 June 2016

Steamed Savoury Yam Cake 蒸芋头糕


Yam cakes with lots of, lots of, yam cubes - that's one of the features of home edition yam cake. Besides, we have the luxury of adding our favourite toppings like sweet Chinese BBQ pork bits, or bacon bits if we prefer savoury to sweet. 
I replaced part of the rice flour ingredient by wheat starch to make the cake softer. A little tapioca starch also helped in enhancing the yam cake taste by adding springiness to plain firmnes :) 

Yield: two 15cm-diameter by 5 cm tall round cakes

Ingredient A:
100g rice flour 粘米粉
35g wheat starch 澄粉
15g tapioca flour 木薯粉
1/2 tsp salt 盐
1/2 tsp seasoning powder 调味粉
1/2 tsp pepper 胡椒粉
500g water 水

Ingredient B:
250~300g peeled yam 去皮芋头
2 tbsp minced garlic 蒜泥
1 tsp fried onion crisps 葱头酥
20g dried shrimp, minced 虾米
10g shiitake mushrooms, sliced 香菇片
20g chinese sausage*, diced 腊肠切粒
3/4 tsp light soya sauce 酱清
2 tsp sugar 糖
1/4 tsp pepper powder 胡椒粉
1/8 tsp give spice powder 五香粉
100~120g mushroom water + shrimp water + water 泡香菇和泡虾米的水
* can replace by 肉干 or Chinese pork jerky 可由肉干取代


Garnishing ingredients 
20g 肉干 or Chinese BBQ jerky
Cut spring onion
Cut red chilli
Fried onion crisp
Roasted sesame seeds

Sweet sesame sauce
Sambal chilli paste


Directions:
1. Line two 15 cm round heat-resistant cake moulds with parchment paper at the base. Lightly coat the wall with vegetable oil.

2. Soak mushroom and dried prawns till soften. Mushrooms slice into thin strips while dried prawns chopped into bit size.
Keep the soaked water for later use.

Collect the soaked water and add water, if necessary, to make up a 100 to 120 ml mixture. Set aside.

3. Mix ingredient A and let it stand for an hour.


4. Cut yam into 1cm or smaller cubes. Set aside.


5. 
Heat up about 2 tbsp of oil in a non-stick pot at medium heat. Stir-fry minced garlic till frangrance.


Add in chopped dried shrimp, mushroom slices and onion crisps. Stir-fried till frangrant.

Stir in the 肉干粒 or Chinese BBQ pork.


Add in yam cubes, and followed by 5- spice powder and other seasonings. The amount of 5-spice powder will be determine by your preference.


Pour in the mushroom water mixture from (2). Stir till the ingredients absorbed all the liquid.


6. Pour ingredient A into B and mix well. Stir the mixture in low heat, till it slightly thickens.


7. Pour the cooked ingredients from (4) into the prepared cake moulds.
Lightly bang the cake moulds to even out batter.

8. Place the two batters in a steamer and steam at high heat for about 35 to
40 minutes, or till an inserted cake tester came out clean.


Let the 2 cakes cool over a wire rack.
After the cakes have return to room temperature, cover and keep the cakes in a fridge overnight. 

9. Unmould and cut the cakes. After steaming, sprinkle all the garnishing ingredients before serving. 
Enjoy :)


Wednesday, 29 June 2016

Japanese Little White Bun 小白


Little white bun - soft, slightly chewy, and mildly sweetened. I would consider it as low fat, as it only involved 10g of butter and 5g of coconut oil against a 210g flour weight.
The little groove in the middle of the bun is the main characteristics of this bun. It was supposed to resemble the little butt of a baby. But mine didn't seem to fit the description ><
This is the first time that a high ratio of top flour has been used against bread flour in a bread recipe - almost 1:1. The ratio usually was 1:10.
The softness of the buns was able to last till the third day without the needs to heat up :)


Yield: 8 buns
Raw dough weight: 405g
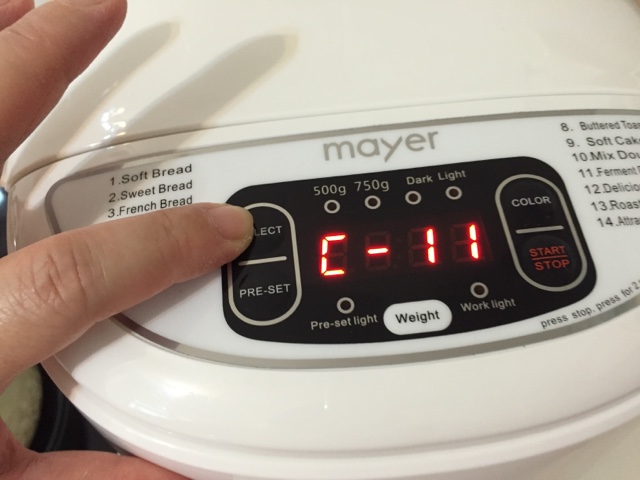
Bread maker: Mayer MMBM12

Ingredients 
90g fresh milk
50g water
10g condensed milk
25g sugar
1/4 tsp fine salt
10g cold butter
5g coconut/vegetable oil

110g bread flour
100g top/cake flour
3/4 tsp instant dry yeast


Directions 
1. Mix cold fresh milk, cold water and condensed milk in a beaker.  Pour the mixture into the bread pan.


2. Add in sugar, salt, cold butter and coconut oil.


3. Pour in bread flour and top/cake flour mixture.


4. Dig a hole and pour in the instant dry yeast.


5. Place the bread pan into the bread maker, select C-11 "ferment dough" function, and start the machine.


6. When the program stops, let the dough continues to proof in the bread pan for another 15 minutes.

15 minutes later.


7. Turn out the dough onto a floured surface. 

Flatten it with your palm to release the trapped air.


8. Divide the dough into 8 equal portions, about 50g each.


9. Roll up the individual doughs and shape into balls by pulling down the side of the dough, and seal at the bottom.


10. Cover and let the dough rest for 15 minutes.


11. After the rest, lightly press down the dough, and shape the dough into a ball again.


Coat the dough with some flour, use a chopstick to impressed a groove in the middle of the bun. 
Be careful not to cut the dough into half!


Place the dough on a non-stick baking tray lightly sprinkled with flour.


12. Spray some water and let the dough proof in a closed oven for about 35 minutes, or when the doughs are about 1.5 times larger.


13. Remove the doughs from the oven. Start to preheat the oven to 180 degree Celsius.


14. Use a sieve to sprinkle some bread flour over the top of the dough.


15. When the dough is in the oven, lower the temperature to 160 degree and bake for 10 minutes; further reduce the temperature to 150 degree Celsius and bake for 10 to 12 minutes, or till the top slightly brown.

End of baking :)


16. Transfer the buns out of the oven and allow them to cool down.

After the buns have cooled down, lightly press down the grooves with a chopstick to "re-construct" the grooves :|


You can eat it plain, or

with some homemade strawberry jam :)


Recipe adapted from 
with great appreciation :)