Thursday, 31 July 2014

Steamed Pumpkin Custard Buns


The recipe replaces water by pumpkin purée, which gives the buns the nice golden colour.  A soft sweet snack to enjoy with tea.
Failed to craft the buns into a chrysanthemum, but more like a porcupine :(
 
Yield: 16 x 8cm round buns

Pumpkin purée
~100g raw pumpkin chunks

1. Steam the pumpkin chunks at medium high heat for about 15 minutes, till soften.

2. Transfer the water in the bowl to another small bowl. You can use the collected water for adjusting the moisture of the dough later.

3. Mash the pumpkin while it is still hot into a paste.

4. Partially cover the hot pumpkin paste and set aside.


Custard Filling
Ingredients
200g whole milk
60g whipping cream
100g instant custard powder

Direction
1. Mix whole milk and whipping cream in a bowl.

2. Pour instant custard powder into the milk mixture, and mix using a hand whisk. Let the mixture stands for about 5 minutes before use.


The Sponge
Ingredients
60g all purpose flour
3/4 tsp instant dry yeast
60g water

Direction
1. Mix flour and instant dry yeast in a mixing bowl.

2. Slowly add in the 80g of water, stir in one direction till it form into a paste.

3. Cover and let the dough proof for 30 to 45 minutes.


The Dough 
Ingredients 
Sponge from above
165g all purpose flour
23g corn flour
30g confectioner's sugar
1/2 tsp double action baking powder
15g rice bran/corn oil
67~75g pumpkin purée, add as required

16 small pieces of 2 cm pandan leaves
16 pieces of 5 cm square paper

Direction
1. Mix all purpose flour, corn starch, and confectioner's sugar by using a hand whisk.

2. Pour the sponge and oil into the mixture in (1).


3. Add in 70g of pumpkin purée and stir all the ingredients into a big lump.
Leaving behind about 10g of pumpkin purée to be added depending on the consistency of the dough.
Avoid adding too much pumpkin purée to the dough, to help the buns to keep its shape after steaming.

4. Transfer the dough onto a floured work top and knead into an elastic and smooth dough.


5. Flatten the dough and divide into 16 portions, each about 27g. Roll into balls, coat with some flour, and place in a mixing bowl.


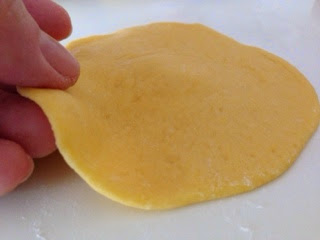
6. Roll out the dough into a flat dough skin with the edge thinner than the center.
Flip the dough skin over, so the smoother side will be facing out when wrapped.

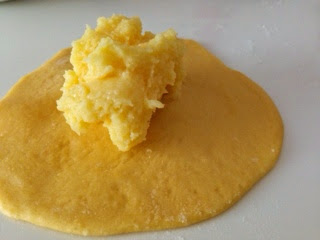
7. Scoop a lump of custard paste onto the center of the dough skin. Wrap up and pinch to seal. 


8. Use a pair of scissors to snip the dough into a spiny dough. You may omit this step if you prefer a simple round bun.

9. Place the dough over a pandan leaf and a piece of paper.

10. Proof the buns for 30 minutes before steaming.

11. When the water boils, steam the buns for 7 minutes under medium high flame.

Turn down the flame to low and open the lid slightly for 3 minutes.

Turn off the flame, and let the buns stay in the steamer for 5 minutes.


12. Transfer the buns to a cooling rack.

You can also keep the warm buns in a rice cooker.

10. Serve warm :)
Keep the unconsumed buns in a fridge and steam them before consumption.


Wednesday, 30 July 2014

Mini Rice Cooker Sour Cream Cranberry Cake


A small cake baked in a mini 1.5L rice cooker. The concealed space of the rice cooker helps to hold the moisture within the cake during baking. This small volume cake also makes electric mixer dispensable. A hand whisk and a spatula are all you need to whip up the batter ^^
A not-so-rich velvety butter cake just nice for afternoon tea. No over eating assured ^^

Yield: one 13cm round cake

Appliances needed
Mini rice cooker, 1.5L, 200W


Ingredients:
50g unsalted butter, softened 
1/8 tsp salt
1 egg, room temperature
50g fine sugar
80g top flour
1 tsp baking powder
30g sour cream
50g milk, room temperature
10g chopped dried cranberry 

Direction 
1. Grease the rice cooker inner pot with either butter or cooking oil spray. 

2. Mix and loosen flour and baking powder. Set aside.

3. Use a pair of scissors to cut the cranberry into smaller bits. Toss the cranberry bits with some flour. Set aside.


4. Cream the softened butter to pale yellow using a hand whisk. This will take about 1 minute.
The softened butter is not advisable to reach glossy stage. If the outer layer of the butter becomes glossy, return it to the fridge for 5 minutes before whipping. 


5. Add sugar and salt, mix till the sugar is well incorporated with the butter. This will take about 3 to 4 minutes. Scrape down the butter on the side once in a while.


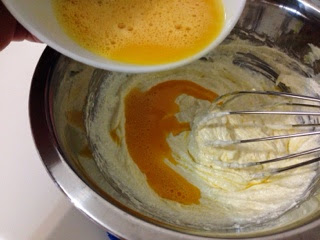
6. Add in beaten egg, in about 5 additions, and blend well.


7. Add in the sour cream till well incorporated.

8. Add in 1/3 of the flour mixture from (2) into (7) and mix using the hand whisk. Add in 1/2 of the milk and blend well. Alternating between flour and milk till you finish all the ingredients.
Stop mixing once no flour can be seen. Extensive stirring will result in gluten formed and a harder cake.


9. Pour in the dried cranberry bits and fold in using a spatula.


10. Preheat the rice cooker by turning on the "keep warm" mode for about 3 minutes.

11. Pour the cake batter into the rice cooker. Give the pot a few jolts to get rid of trapped air and to even out the surface.


12. Put the pot into the rice cooker, close the lid and start the cake baking process by selecting the "rice cooking" mode.


After awhile, the rice cooker will switch to "keep warm" mode. Wait for 3 minutes, then switch on the rice cooking mode again.
Repeat this process for about 25 minutes, or till an inserted stick came out clean of the cake. Check the readiness of the cake when you start to smell nice butter aroma. 
Avoid opening the rice cooker too often, as this will extend the baking time.

13. When the baking process is over, open the lid and invert out the cake onto a cooling rack.


14. Cut and serve when the cake has cooled down :)


Sharing corner 🌻🐝
1. Stir the ingredients, especially after  flour has been added, in alternating clockwise and anti-clockwise directions. This helps to prevent the build up of gluten in the batter which will give rise to a tougher cake texture.

2. Minimize the mixing time for the same reason as point 1. As long as about 80% of the flour has been incorporated, you can stop stirring. The subsequent mixing will eventually take care of the remaining unmixed flour.