Thursday, 30 April 2015

Vanilla Ice Cream with Jam 香草果酱雪糕


Keeping a pack of whipping cream, some cold condensed milk, and a small jars of jam in my kitchen, I can have homemade ice cream at the convenience of my kitchen. The best of all, I can control over the ice cream sweetness and produce the exact quantity for the four of us - no extra, no wastage.


Yield: 4-person portion

Ingredients
200ml whipping cream 35% 植物性鲜奶油
80g cold condensed milk 冷炼乳
1 tsp vanilla extract 香草精
28~50g fruit jam 水果酱

Some fresh blueberries 鲜蓝莓
Some crushed toasted cashew nuts 碎腰豆


Directions
1. Keep a damp kitchen cloth, a deep metal mixing bowl, and a pair of whisks in the freezer for 1/2 an hour.
Keeping the equipment cold is essential in whipping up the cream in our hot climate.


2. Loosen the jam using a chopstick. Set aside.

3. Pour cold whipping cream into the cold mixing bowl standing on the cold kitchen towel. Whisk the cream at high speed for about 2 minutes, or till the cream becomes firm.
Do not over whisk the cream as it will disintegrate into butter and milk!


4. Add in the cold condensed milk and vanilla extract. Whisk at low speed for about 1 minute to blend the ingredients together.
Test the taste to adjust to your preferred sweetness.


5. Pour in the jam, leaving a small portion behind for garnishing the ice cream later.
Swirl the jam around by using a chopstick.


6. Divide the ice cream among 4 small glass cups. Lightly bang the cups against the kitchen top to level the ice cream.

Add some fruits, like fresh blueberries, in between the cream.

7. Drop a blob of jam and a few fresh fruits onto the cream.

8. Cover the cream with lids and keep in the freezer for about 4 to 5 hours.


9. Allow the ice cream to stand in room temperature for about 5 minutes before serving.

10. Sprinkle some crushed toasted cashew nuts over for additional crunchy  texture :)


The crunchy cashew nut really add a nice nutty aroma and texture to vanilla ice cream. Not forgetting the frozen blueberries, which add surprises to the creamy ice cream.

Unexpected steaks of sweet and sour raspberry jam runs in between the ice cream. Yumz~ ^^


Click the link below for recipe to baked cashew nuts:


Oven Toaster Baked Cashew Nut 焗腰豆


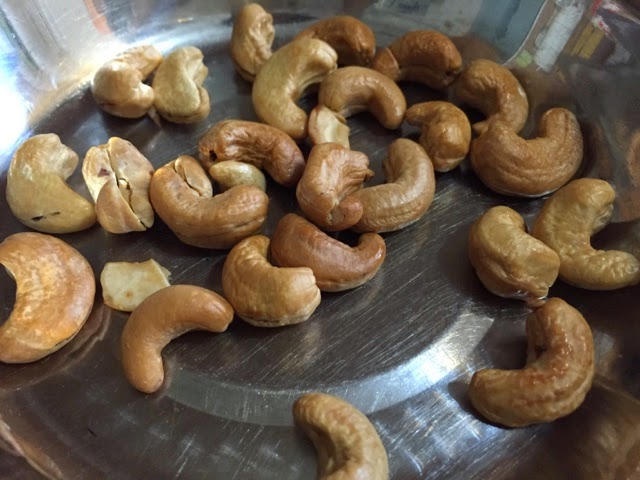
I like to bake my own cashew nuts for dressing up dishes or just as tidbit. They are nicely brown to golden and do not have grains of salt on them. I just give the  nuts a quick "salt bath" before toasting in an oven toaster. 
Cashew nuts are best consumed when they are freshly baked ^^

Yield: 40g lightly salted cashew nuts

Ingredients
40g raw cashew nuts

Directions
1. Give the raw cashew nut a quick rinse. 
Do not soak the nut to prevent the nut from becoming too damp.

2. Add about 1/8 tsp of salt and 30ml of water to the nuts. Give the nuts a quick rinse and pour away the salt water. This is to give the nuts a light coat of salt.

3. Spread out the drained cashew nuts over a metal plate in a single layer.

4. Heat the nuts in an oven toaster at 100 degree Celsius for about 10 minutes. Give the nuts a few tossings after about 5 minutes into baking to ensure even heating.
This process is to dry up the nuts. 


5. Increase the temperature to 150 degree Celsius and start baking the nuts for about 10 minutes.
To ensure even browning, toss the nuts every 1 to 2 minutes. 
To avoid over-browning the nuts, stand closely by your nuts ><

At the end of the baking.

6. Allow the nuts to cool down slightly before munching. Hot nuts are soft, wait for them to cool down :)

Tuesday, 28 April 2015

Burnt Butter SpongeCake (Cooked dough) 烫面微焦奶油蛋糕


This recipe using the gelatinized or cooked dough method by heating up the flour to increase its absorbency of liquid. The cake is soft and moist like japanese cheesecake.  The use of burnt butter also add a nice aroma to the cake. Due to its higher moisture content, the cake can be eaten cold :)

Yield: one 15cm diameter round cake
Cake mould: 6" round mould, 7.5cm tall

Ingredients
All ingredient in room temperature 
Using 60g eggs
50g unsalted butter
1/8 tsp salt
50g top/cake flour
55g fresh milk
3 egg yolks
1 tsp vanilla essence 

3 egg whites
50g fine sugar
6g corn starch


Direction 
1. Line a 6" round cake pan with a small piece of parchment paper if you are using a fixed base cake pan. This is to facilitate removal of cake from the pan.
You may omit this step if you are using a 6" removal base cake pan. 


2. Mix sugar with corn starch. Set aside.

3. Loosen the flour using a hand whisk. Set aside.

4. Add unsalted butter and salt in a heat resistant bowl. Melt butter in low heat till the butter starts to boil  and reach about 115 degree Celsius. When the milk solid in the boiling butter starts to turn brown, removed the melted butter from the stove and rest on a wet kitchen towel. 
Stir constantly to ensure even heating and to prevent a sudden burst of air bubble in the hot butter.


5. When the hot melted butter cool down to around 68 degree Celsius, add in the flour and stir.
If you place the bowl of hot butter over a wet kitchen cloth, it takes about 2 minutes to cool down to 68 segree Celsius. 


6. Stir in the milk.


7. Add in the egg yolks, one at a time, to the batter.

8. Add in the vanila extract and blend well.

9. Cover the butter batter with a lid and set aside.

10. Beat egg white till frothy, for about 30 seconds. Add in the sugar mixture from (2), in 3 batches. 

11. Beat at high speed at the start and reduce to low speed towards the end of the process. Beat the meringue till almost reaching the stiff peak stage. The standing meringue has a slight dip at the tip.

12. Scoop about 1/3 of the meringue into the butter batter from (9). Fold to mix.


13. Pour the butter batter back to the remaining meringue and fold to mix into a smooth batter.


14. Pour the batter into an ungreased  6" round cake mould. Lightly bang the cake mould a few times to remove any trapped air bubbles in the batter.


15. Bake the batter in a preheated oven set at 140 degree Celsius for 25 minutes at lower rack of the oven. 

Increase the oven temperature to 170 degree Celsius for another 25 minutes.


Oven temperature and baking duration may differ based on individual oven.

16. Remove the cake from the oven and  cool down on a cooling rack for about 15 minutes. While the cake is still warm and has stopped shrinking away from the wall of the cake mould, remove the cake from the cake mould and cool down on a wire rack. This is to prevent accumulation of moisture at the base of the cake.


17. Slice the cake and enjoy :)


Recipe adapted from