
First time trying out adding water roux of glutinous rice flour to my bread dough. Bread dough added water roux is usually more sticky than normal bread dough. So I entrusted this "sticky" job to my Mayer bread maker.
My calculation of water roux may not be the norm. I just use 5% of the total flour weight as the base to work out the 1:5 = flour:water ratio.
The bread crumb was light, moist and a little springy - a characteristic of bread added with glutinuos rice water roux :)

Yield: one 20Lx10Wx14H cm loaf
Raw dough weight: 571g
Bread weight: 528g
Equipment: Mayer Breadmaker MMBM12
Water Roux
Yield: About 80g
Ingredients
15g glutinous rice flour 糯米粉
75g water 水
Directions
1. Mix water with glutinuos rice flour in a small heat resistant ware.


2. Heat over low heat, and stir continuously to prevent the flour from sticking to the base.

Continue till the mixture thickens. Once the thickening starts, remove from the heat as the thickening process is very fast.

3. Collect 80g of the water roux for later use.

4. Cover the water roux with cling wrap to prevent the top from developing a crust. Allow to cool to room temperature before use.

Bread Dough
Ingredients
80+10g# cold water 冰水
30g beaten egg 蛋液
80g water roux 汤种
35g fine sugar 细砂糖
3g salt^ 盐
30g cold unsalted butter 冷无盐奶油
270g bread flour 高筋面粉
15g glutinuos rice flour 糯米粉
15g milk powder 奶粉
1 tsp instant dry yeast* 即发干酵母
# 10g of water to be added during the kneading process depending on the dough condition.
^ 3g salt is close to 1/4 heap tsp
* 4g of yeast is about 1 tsp
Directions
1. Mix bread flour, glutinous rice flour with milk powder. Set aside.

2. Pour all the ingredients into the bread pan following the sequence listed in the ingredients.


Dig a hole in the flour and pour the instant dry yeast into it.


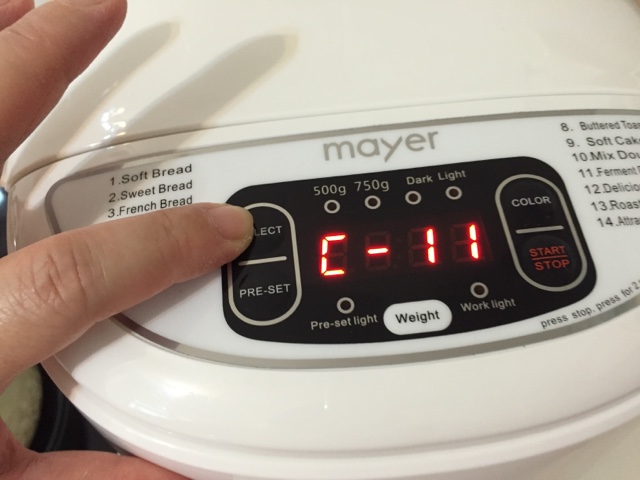
3. Place the bread pan into the bread maker, select C-11 "ferment dough" function, and start the machine.

After about 5 minutes of kneading, if the dough is too dry, pour in the extra 10g of water slowly onto the dough.
If the dough is too dry, it will spin along the axle without touching the wall of the bread pan.

When the dough is of the right moisture level, the dough can stretch out to touch the wall of the bread pan occassionally.


4. The dough is ready.

5. Invert out the dough onto a floured work top. Flatten the dough to release the trapped air. Divide the dough into 3 equal portions, about 190g each.


6. Roll up the dough, fold to let the two ends meet, shape the dough into 3 balls by pulling down the sides, and seal at the bottom.
Cover and let them rest for about 15 min.


7. Flatten the dough and roll out into a flat oval dough.

8. Roll up the dough from the shorter side, cover with a lid, and let it rest for 10 minutes.

Cover and let the dough rest for 10 minutes.

9. After the rest, roll out the dough into a flat dough again. The shorter length of the dough should correspond to the shorter width of the Pullman tin.

10. Flip the dough over so the smoother side will be facing out after rolling up.
Roll up the dough from the shorter end.


11. Place the doughs into a greased non-stick Pullman tin. The open end of the dough should be facing down.

12. Spray some water over the dough and place the doughs in a closed oven.
Let the dough proof in a warm oven for about 60 minutes, or till the dough reaches almost the rim of the Pullman tin.
To facilitates the second proofing, you may switch on the oven to its minimal temperature for about 1 minute.


13. After the second proofing and the dough has reached the rim of the Pullman tin, remove the pullman tin from the oven.
Preheat the oven to 170 degree Celsius. And brush a coat of egg wash or milk over the dough surface.


14. Bake the dough at the lower rack of the oven at 170 degree Celsius for about 40 to 50 minutes. If your Pullman tin has a thinner wall, you can bake for about 40 minutes at the same temperature.

If the top of the bread started to brown too fast, at about 30 minutes into baking, cover with a small sheet of aluminum foil.


15. Remove the bread from the Pullman tin immediately after leaving the oven. Let the loaf cool down on a wire rack before slicing it.


Method adapted from Carol Hu's sharing

with appreciation :)
Ur bread looks awesome! Is it possible to just use the breadmaker to bake the bread? If yes, which program to use?
ReplyDeleteHi, thank you for liking my bread 😊 To bake in the bread maker, you may have to trim the quantity a little to avoid the bread “over-leavened” in the BM. Maybe you can multiply all the ingredients by a factor of 5/6 and use “Soft Bread” function.
Delete