A light and springy spongecake with a nice and sweet butter scent. Happy for being able to decipher the Japanese language recipe to bake this cake successfully. Thank you Google translator \(^o^)/

A little extra batter that I baked in a cupcake paper :)

Sponge Cake
Ingredients
All ingredients in room temperature
Using 55g omega eggs
4 egg whites
80g fine sugar
4 egg yolks
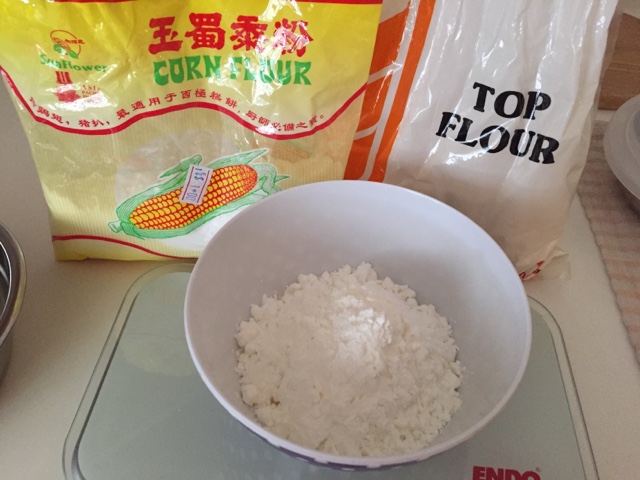
60g top/cake flour
20g corn starch
40g unsalted butter
Directions
1. Coat an 18cm round cake pan with a good amount of butter and dust with bread flour. Set aside.
I used a 7" springform cake pan.


2. Sieve top/cake flour and corn starch for 3 times.

3. Melt unsalted butter in a rice cooker using keep warm mode for about 10 to 15 minutes. Let the melted butter cool down before use.

4. Add egg whites to a clean and dry mixing bowl.

Beat egg whites till frothy, add in sugar gradually.

Continue to beat till almost reaching stiff peak.


Beat till the egg batter can leave an "8” on the surface and can stay for at least 5 seconds.
Reduce the mixer speed to lowest at the last 1 to 2 minutes.
It is important for the egg batter to be well beaten, otherwise, the batter will deflate easily when you add in other ingredients in the later stage.

6. Sieve in the flour mixture from (2).

Mix manually using the whisks. Do not over mix.

After you have added in all the flour, use a spatula to give a more thorough mixing at the end.

7. Take a small portion of the egg batter to mix with the melted butter.

8. Return the butter batter to the egg batter, and mix well using a spatula. Ensure no butter is sink at the bottom.


9. Pour the batter to the prepared cake pan. Bang lightly to remove any trapped air bubbles in the batter.

I keep a small portion of the batter in a cupcake paper, to keep the batter within the 4/5 height of the springform pan.

10. Bake at the lower rack of a preheated oven set at 170 degree Celsius for 30 to 35 minutes.

11. After leaving the oven, drop the cake with the pan from a height of about 10cm thrice.

12. Invert the pan to cool on a wire rack.

Remove the cake pan when the cake dislodge and rest on the wire rack.

Cover with a paper tissue to minimize the moisture loss from the cake. Wait for the cake to cool down completely before cutting.

<<<<< Optional >>>>>
1) Cut the cake horizontally into 3 layers.

2) Spread vanilla ermine cream evenly over the cake surface and arrange sliced strawberries over.

Place the second layer over and repeat the same step as above .

Place the top over, cover with an inverted tall container.

Place in the fridge for about 90 minutes to firm the cream and the cake layers.

3) Cut and serve. Enjoy :)


Vanilla Ermine Frosting & Garnishing
Ingredients
10g honey
40g milk
5g all purpose flour
1/4 tsp vanilla extract
40g salted butter, slightly softened
5g icing sugar
Directions
1. Add all purpose flour to honey and milk, mix well.

2. Heat over low heat till the mixture thickens. Stirring constantly.


3. Stir in the vanilla extract.

4. After the milk roux has cooled down to room temperature, seal with food wrap and store it in the fridge till needed.

5. After whipping the softened butter till creamy, add in the sugar and whip till it is light and pale.
I used fine sugar as I was lazy to search for the icing sugar. It's better to use icing sugar for a smoother cream.


6. Add in the cold milk roux, spoon by spoon. Mix well before adding the next spoon.


7. Cover and refrigerate till need it.

8. Slice 3 strawberries into thin slices. Set aside in the fridge.

Recipe adapted from
with arppreciation :)