Monday, 26 September 2016

Frozen Strawberry


Strawberries are easy perishable fruit especially in our tropical climate. Even if they are kept in the fridge, they would turn bad or dehydrated in a few days. 
Fresh strawberries are commonly sour. Therefore, I would usually blend them into smoothies either with milk or water.
To extend the shelf life of the fresh strawberries, I prefer to keep them in frozen form. The frozen strawberries can be used to replace ice cubes in the smoothie. Without the presence of water (in the form of ice) in the smoothie, it helps to blend a thicker and richer smoothie.


Storage
1. Wash strawberries with vegetables wash. Drain and shake off extra water. Cut the strawberries into cubes.


2. Keep the strawberry cubes in a container, and covered with 2  layers of paper kitchen towels, followed by the lid.


4. Keep the container of strawberries in the freezer till needed. The best to use them within a week.


Strawberry pineapple smoothie
Just blend the frozen strawberries with pineapple chunks, and cold water. 
As I used canned sweetened pineapple, so I can omit the honey.


Strawberry Milk Smoothie
Just blend the frozen strawberries with cold fresh milk, whipping cream and honey.Top up with whipping cream.


Thursday, 22 September 2016

Lemon Cream Cheese Pound Cake


 I modified a butter pound cake recipe to substitute part of the butter quantity by the more nutritious and lesser fat cream cheese. My first attempt was a failure - the cake texture was too dense :( 
 
This is my second attempt. The cake texture has improved, but there was a minor crack on the surface :(

The cake has a faint taste of cream cheese, and tasted slightly tart because of the lemon juice. A not-too-oily pound cake to try on :)


Yield: One 20Lx10Wx5H cm cake

Ingredients
All ingredients in room temperature.
Using 55g eggs
135g top/cake flour
15g milk powder
1/2 tsp baking powder
85g unsalted butter, softened 
30g cream cheese, softened
110g fine sugar
3 eggs
1 tbsp golden syrup/honey
1/2 tsp vanilla extract
20g lemon juice
1 tbsp lemon zest

Directions

1. Extract 20g of lemon juice and collect about 1 tbsp of lemon zest from a lemon.


2. Softened butter and cream cheese in room temperature for about 15 minutes.


3. Mix cake flour, milk powder and baking powder together in a bowl.


4. Beat eggs together and set aside.


5. Cream butter, cream cheese and sugar together till light and fluffy.


6. Gradually blend in the beaten egg to the batter. Add in small quantity after each mixing.


7. Sieve in the flour mixture from (3) into the batter and mix briefly. 
Try not to over mix the flour.


8. Mix in the golden syrup, vanilla extract, lemon juice, and lemon zest.


9. Use a spatula to give a more through mixing.


Pour the batter into the prepared cake pan.
For non-silicon cake pan, please grease with butter and sprinkle a thin layer of flour over, or line it with parchment paper


10. Bake at 170 degree Celsius for about 50 to 60 miuntes at the middle rack of the oven. Check with a cake tester. The inserted cake tester should come out clean if the cake is done.
The stated baking time is an estimation, the final timing would have to be confirmed after my next bake ^^

or
10. Bake at the lowest rack of a preheated oven set at 170 degree Celsius for about 40 minutes turning on only the upper heating coil.
The purpose is to "strengthen" the top crust, so the hot batter below will not push through it and cause the crack. This mission failed :(

After the 40-minute top baking, turn on both the top and bottom heating coils, lower the oven temperature to 160 degree Celsius and bake for another 25 to 30 minutes, or till an inserted cake tester came out clean.

End of baking.

Test with a cake tester.


11. Let the cake stay in the cake mould for about 15 minutes.


Invert out the cake and let it cool on the wire rack. I covered the cake loosely with a sheet of paper kitchen towel to prevent it from drying out.


12. Slice and enjoy :)
The cake taste better on the next day :)


Monday, 12 September 2016

Sweet Potato Butter Bun 甜薯奶油面包


An aromatic sweet potato bun with tender soft crumb, topped up with sweet dessicated coconut soaked in melted butter. 

In order to make full use of the leftover steamed sweet potato chunks, I mashed them into paste and added cocoa powder, honey and whipped cream, to make them into a soft filling for the buns. Honestly, you won't know it is made of sweet potato if I didn't tell you 😆


This is the Indonesian honey sweet potato. After steaming, it is sweet but drier than the orangy sweet potato. Hence, you may need to adjust the water quantity according to the water content of the sweet potato used ☘

Yield: 9 small buns in a 20cm square pan
Breadmaker: Mayer MMBM12
Raw dough weight: about 488g

Sweet Potato Bun
Ingredients

80~95g cold water # 冷水
20g beaten egg 蛋液
20g raw sugar 黄砂糖
1/4 tsp fine salt 细盐
20g cold unsalted butter 冷无盐奶油
90g honey sweet potato paste* 甜薯泥

200g bread flour 高筋面粉
8g milk powder 奶粉

3/4 tsp instant dry yeast 速发干酵母

# if you are not used to handling sticky dough, you may want to reduce the water quantity to 85 or 90g. The amount of water also depends on the moisture level of the mashed sweet potato.
若不要面团太粘手,可将水量减至85或90g

* can use raw unpeeled sweet potato weighs between 180g to 260g
可用180至260g的甜薯取得所需的甜薯泥

Glazing & Toppings 表面装饰
Some beaten egg as egg wash 蛋液
10g cold butter 冷奶油
Some fine sugar 细砂糖
Some dessicated coconut 干椰丝


Directions

1. Line a 20cm square pan with parchment paper.

2. Place sweet potato chunks with pandan leaf (optional) in a heat resistant bowl. Steam at high heat for about 20 minutes, or till a thin skewer can poke through the sweet potato easily.


3. Remove the pandan leaves and drain away the excess liquid. While the sweet potato is still hot, mash it using a fork. Collect 90g of sweet potato paste.
Keep the remaining sweet potato chunks as filling later.


4. Add all ingredients, following the sequence listed in the ingredient list, into the bread pan.


5. Dig a hole and pour in the instant dry yeast.


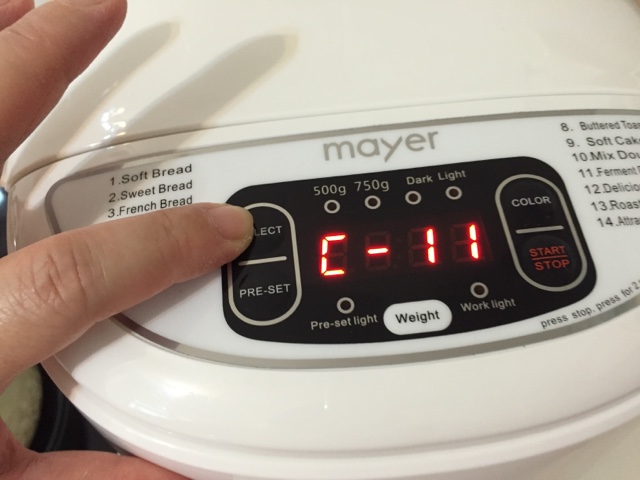
6. Place the bread pan into the bread maker, select C-11 "ferment dough" function, and start the machine.
The mixing, kneading and first proofing will take 1h 30min to complete.


7. When the program stops, let the dough continues to proof in the bread pan for another 20 minutes.


20 minutes later.


8. Sprinkle some flour over the dough and work top before inverting out the dough.
Press down the dough to release the trapped air. 


9. Divide the dough into 9 equal portions, about 54g each. Shape them into 9 ball shape doughs, by rolling up and pulling down the sides of the dough, and seal at the bottom.


10. Cover the dough balls and let them rest for about 15 minutes.


11. After the 15-minute rest, wrap a cocoa sweet potato ball in the center of the dough, and seal tight.
The preparation of the cocoa sweet potato balls can be found at the end of this recipe.


12. Roll the dough into a smooth ball, and place it in the lined baking pan from (1).


13. Spray some water over the doughs. Place in a closed warm oven to proof for about 40 minutes, or till the doughs are almost 80% touching each other.


40 minutes later.


14. Remove the dough from the oven and preheat the oven to 170 degree Celsius.

15. Brush some beaten egg over the surface.

Snip a shallow slit over the top of the buns.


Cut the 10g cold butter into 9 small cubes and place on the slits.


Sprinkle some dessicated coconut over.


Sprinkle some fine sugar on top.


Ready to go into oven.


16. Bake at 170 degree Celsius for about 15 minutes at the middle rack. 


Then further reduce the temperature to 150 degree Celsius and bake for another  4 to 5 minutes, or till the bread turns golden.


End of baking


17. Allow the bread to rest in the pan for 5 minutes before unmoulding the bread by lifting up the parchment paper. Let the bread cool down slightly on a wire rack before serving. Enjoy it warm 😄


Cocoa Sweet Potato Filling
The cocoa sweet potato filling is based on the leftover sweet potato, therefore the final quantity of the filling will vary.
The quantity below is based on 50g of leftover sweet potato, so you will have to make adjustments based on the quantity you have.


50g sweet potato paste *
1/2 tsp cocoa powder 
1 tsp whipping cream 
1/2 tsp honey 

You may adjust the sweetness according to your taste. 
You may omit the whipping cream, or replace it by butter or milk. The purpose is to make the paste smoother and more moist.


* If the mashed sweet potato is too wet, you can add some roasted almond flour to it.