Showing posts with label Rice cooker dish. Show all posts

Saturday, 23 October 2021

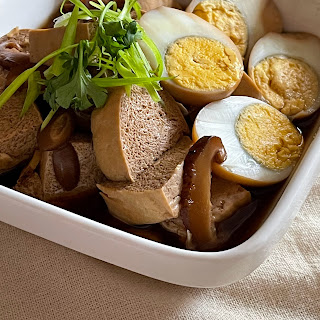
Braised Thawed-Frozen Tofu in Angelica Root Flavour


If you love braised soya bean cakes and angelica root or 当归 eggs, you most probably would love this dish 😋 Using porous thawed-frozen soya bean cakes helps to absorb the angelica root flavored stock faster and more readily. And the firmer and slightly chewy texture also prevented the soya bean cakes from breaking during stirring and cooking.

Using a mini rice cooker and yosenabe sauce to cook the dish help to make the cooking process simpler. And most importantly, the dish was still very delicious 😋


Servings: 2 to 3 persons
Equipment: mini rice cooker

Ingredients
280g small soy bean cake, 2 cakes
1 dried shiitake mushroom, soaked and sliced, keep the mushroom water
2 small kampong eggs

Braising Stock
About 300~350g water
About 40ml mushroom water
35g Kikkoman Yosenabe sauce
5cm white scallion
2 slices angelica root 当归片
2 cubes rock sugar
a little dark soya sauce for adding colour


Directions
1. Freeze 2 small soya bean cake in their packaging for about 3 to 4 hours, or till totally solidified. Then thaw them in room temperature till totally softened.
I usually will keep a fresh pack of soya bean cakes in the freezer, so I can thaw them any time to cook them.
Cut the thawed-frozen soy bean cake into 8 pieces for each cake. Set aside.

2. Prepare two hard-boiled eggs by steaming. As the eggs I used were smaller in size, I only needed to start the countdown timer at 10 minutes instead of 15 minutes recommended in the recipe.
Peel the eggs and set aside.


3. Pour all the Braising Stock ingredients into the inner pot of a mini rice cooker. Start the cooking process. Do not lock the lid, and stay close to the mini rice cooker before the content boils! 

When the stock starts to boil, add cut soya bean cakes and hard boiled eggs to the stock.
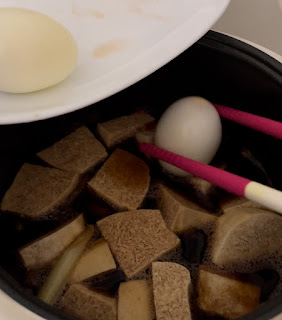
When the content start to boil again, switch the cooking mode to "food warming" mode. Lock the lid after the boiling has subsided. Let the content simmer for about 30 to 60 minutes. Stir the content occasionally to ensure uniform coating of the stock to the soya bean cakes and eggs.
Beginning of the simmering

End of 1-hour simmering
4. Serve the dish warm and garnish with green scallion and coriander leaves 😋😍


This dish became the main dish of my Saturday Meat-less lunch 😀


Sunday, 12 June 2016

Rice Cooker Winter Melon Pork Rib Soup 电饭锅冬瓜排骨汤


A few advantages of cooking winter melon pork rib soup in a rice cooker are, you'll be able to get clear soup, tender meat, and keeping the softened winter melon chunks in whole. Less attention is needed as the rice cooker thermostat and timer helps you monitor the cooking process and deliver it at your preset time :)


Servings: about 4 adults

Equipment: rice cooker with "Soup" function

Ingredients
400~500g peeled winter melon 去皮冬瓜
400~500g pork ribs 排骨
1 slice ginger 姜
1 stub white scallion 白葱段
1 stub coriander root (optional) 芫荽根
300~400g water 水
1/2 tsp rice wine 花雕酒
Salt & seasoning powder 盐和调味料


Directions
1. Cut away the winter melon skin and seeds, then slice the winter melon into thick chunks.


Don't discard the winter melon skin, you can use it to brew winter melon tea with dark brown sugar, pandan leaf and rock sugar. Directions can be found at the end of this recipe


2. Wash and rinse pork ribs. Season with 1/4 tsp each of sugar and low-salt light soya sauce for about 15 minutes.


3. Pour in the boiling water and parboil the ribs for 15 minutes. 

Drain away the water and set aside.


4. Cut 1 slice of ginger, 1 stub of white scallion, and 1 stub of coriander root.


5. Turn on the "Steam" function of the rice cooker to heat up the inner pot.

Heat up about 1 tsp of olive oil and add in the ginger, white scallion, and coriander root. 
Stop the "Steam" function when the ingredients become fragrant.


6. Turn on the "Soup" function, and set the "Cooking Time" to 1:00 hour.
Start a 50-minutes-countdown timer at the same time. This is to mark the time to add in the winter melon chunks.


7. Pour in the pork ribs to stir-fry for about 1 minute. 

 Add 1/4 tsp of rice wine.


8. Pour in about 300 to 400g of water to cover about 3/4 of the ingredients' height.


Close the lid and let the rice cooker continues the cooking process. 
Stir the ingredients once in a while to ensure even heating.


10. When the countdown timer reads 0:10, drop in the winter melon chunks.


Bring the pork ribs above the winter melon chunks, so that the latter can be cooked more thoroughly.
Close the lid, and let the cooking continues.


11. When the cooking process ends, allow the rice cooker to "Keep Warm" for 5 minutes.


12. When the winter melon becomes translucent, the winter melon is cooked.

Add in the salt and seasoning to taste.


13. Let the ingredients simmer for another 1 hour for a softer texture using the remnant heat of the rice cooker.
Try not to stir the ingredients in order to keep the softened winter melon chunks in whole piece.

The soup is ready.

Enjoy it warm with steamed rice :)


<<<<<<<<<>>>>>>>>>
Winter Melon Tea

1. Bring winter melon skin, pandan leaf, dark brown sugar and water to a boil.


2. Drop in the rock sugar and lower the heat. Simmer for about 30 minutes.

3. The winter melon tea is ready :)


Tuesday, 7 June 2016

Rice Cooker Black Bean Pork Rib Soup 电饭锅黑豆排骨汤


I love black bean pork rib soup, but I hardly cooked this. Reason? I couldn't soften the beans despite hours of simmering =_=
In one of the episodes of Channel 8 program, "Life Hacks", I learned the trick of shortening the cooking time of beans. The soaked beans were first 
frozen, then thawed before cooking. When water freezes, it expands in size, thus "cracking" the structure of the bean internally. After thawing, the beans become porous, so easier to soften.
This trick works wonderfully. The black beans become soft within 1 hour of cooking (^-^)


Equipment: rice cooker with "Soup" function

Ingredients
40~50g organic black beans 有机黑豆
400~500g pork ribs 排骨
1~2 cloves garlic 蒜头
1 slice ginger 姜
1 stub coriander root (optional) 芫荽根
300~400g water 水
1/2 tsp rice wine 花雕酒 
Salt & seasoning powder 盐和调味料


Directions
1.  Wash black beans and pour very hot water to soak them for about 1 to 2 hours, or till the beans swelll, and some of the bean skins cracked.

2. Keep the soaked black beans in an air tight container, and place in the freezer overnight.
Thaw the frozen black beans before cooking.


3. Wash and rinse pork ribs. Season with 1/4 tsp each of sugar and low-salt light soya sauce for about 15 minutes.


4. Pour in the boiling water and parboil the ribs for 10 to 15 minutes. 

Drain away the water and set aside.

5. Cut 1 slice of ginger, lightly crush the garlic, and cut 1 stub of coriander root.


6. Turn on the "Steam" function of the rice cooker to heat up the inner pot.

Heat up about 1 tsp of olive oil and add in the ginger, garlic, and coriander root. 
Stop the "Steam" function when the ingredients become fragrant.


6. Turn on the "Soup" function, and set the "Cooking Time" to 1:20 minutes.


7. Pour in the pork ribs to stir-fry for about 1 minute. 

 Add 1/4 tsp of rice wine.

follow by the thawed black beans.


8. Pour in about 300 to 400g of water to cover about 3/4 of the ingredients' height.


Close the lid and let the rice cooker continues the cooking process. 
Stir the ingredients once in a while to ensure even heating.


10. When the cooking process ends, season the soup with salt and seasoning powder to taste.


11. Let the ingredients simmer for another 1 to 2 hours for a softer texture using the remnant heat of the rice cooker.


Enjoy it warm with steamed rice :)