Tuesday, 20 November 2012

Low fat vegetable cream of mushroom


Yield: 4 small servings

Ingredients:
200g white button mushroom
1/2 onion
1 clove garlic
20g carrot
20g pumpkin, diced
200 ml milk
50ml water
1 tbsp oatmeal or 1 tsp potato starch

The ingredients

Seasoning to taste:
Salt
Black pepper
Seasoning powder

Direction:
1. Clean button mushroom using a wet kitchen towel. Slice 2 mushrooms and toast in a oven toaster at medium heat for 10 minutes. Reserve these mushroom slices for bowl decoration.
Grind the rest of the mushrooms in a food processor or blender.

Grind the mushroom in a blender
or food processor.

2. Grind onion and garlic. Set aside.

Grind onion and garlic.

3. Heat 1 tablespoon of olive oil in a pot. Stir-fry minced onion and garlic till fragrant. Add in ground and cut carrot and pumpkin, stir-fry till ingredients soften.


Stir-frying cut carrot and pumpkin with
onion and garlic

Heat the minced carrot and pumpkin
till it softened

4. Pour in the ground mushroom and heat till it fragrants.

Cook the ground mushroom till fragrant.

5. Add in the milk and water, continue to heat till it boils.

Add in the milk and water

7. Season to taste.

8. Add in a tablespoon of oatmeal or 1 teaspoon of potato starch (mix with 2 tbsp of water) to thicken the soup.,

Adding a tablespoon of oatmeal to
the soup towards the end.,

Serve hot in a bowl or bread bowl :)


Italian bread bowl


Yield: 4 bread bowls

Ingredients:
270g warm water, about 35 degree C
1 tsp raw sugar
2 tsp dry yeast
440g all-purpose flour
Dash of oregano powder
9g or 3 tsp olive oil
1 tsp salt
2 tsp milk, as milk wash for brushing the bread

Directions:

1. Mix all- purpose flour and dash of oregano together. Set aside.

Add oregano powder to the flour
and mix well.

2. Mix warm water with sugar and yeast. Let it stand for 10 minutes to activate the yeast.

Acitivating the yeast before adding
flour.

3. Pour in olive oil and salt, then follow by 1/2 the quantity of flour. Mix well before adding the next batch of flour. Each addition of flour is half the quantity of the remaining flour.
When most of the flour has became crumbs, stop adding flour and try to gather the crumbs into a big lump. Leave about 2 to 3 tsp of flour to adjust the moisture of the dough.

Stop adding flour, when you see
these small lumps.

Keep behind some flour for adjusting
the moisture of the dough.

To adjust the moisture of the dough:
>If the dough is too sticky, add a teaspoon of flour at a time.
>If the dough is too dry, add a teaspoon of water at a time.

4. When all the ingredients have combined into a lump, use an electric mixer fixed with dough hooks to knead. Continue to knead until the dough is smooth and elastic. This may take about 10 to 15 minutes.

Use a pair of dough hooks to knead

5. On a parchment paper, apply some oil. Shape the bread dough into a ball and place on the greased parchment paper. Proof the dough in a rice cooker for 50 minutes. Switch on the 'keep warm' mode of the rice cooker for 5 minutes then switch off.
You may also keep the dough in a big bowl to proof at warm room temperature. Sprinkle some water on the surface of the dough. Cover the bowl and let the dough proof for about 1 hour.


Proofing in a container covered with
a transparent lid or film.

6. To test whether the proofing is done, insert your index finger coated with flour into the middle of the dough. If the hole does not close up after you remove your finger, then the proofing is done. Otherwise, continue to proof for another 10 minutes and test again.

7. Divide the dough into 4 portions and shape into a ball. Place the 4 doughs on a parchment paper applied with a light coat of oil and sprinkled with oatmeal. Keep the doughs in the oven set at 35 degree Celsius to do the second proofing. Place a small cups of hot water in the oven to raise the humidity of the oven. The second proofing will take about 40 minutes.


Divide the dough into 4 portions


After applying a coat of oil,
sprinkle with some oatmeal.

Proofing in the oven, place a small
cup of hot water below.

8. Before baking, remove the dough from the oven, brush the surface with milk wash . Return the bread doughs to oven preheated to 200 degree Celsius. Bake for 15 minutes or till slightly brown.


Baking in the oven.

9. Take the breads out of the oven and re-apply another coat of milk wash. Continue to bake for another 15 minutes. When the oven bell rings, turn off the heat and let the bread stay in the oven for 5 minutes. Then open the oven door slightly for another 5 minutes.

Finish baking!

10. Cool the breads on a wire rack before cutting the top off and scoop the bread center out to serve with soup.

When the bread cools down, cut off the top and
scoop out the centers.

Saving the centers of the bread:
1. Put all the bread centers in a plastic bag.

2. Melt 20g butter, 1 tsp sugar and pinch of salt with 2 minced garlic in a toaster oven.

Adding minced garlic to the
melted butter and sugar.

3. Drizzle the melted garlic butter onto the bread center crumbs and shake the plastic bag to spread evenly.

4. Spread the bread crumbs onto a tray lined with parchment paper. Toast them in high heat in a toaster oven for about 15 minutes.
Serve with soup :)

Drizzle the butter garlic onto the
bread centers.
Garlic butter bread crumbs.


Monday, 19 November 2012

Low fat chicken potato casserole


This recipe uses rice cooker to cook the potato and carrot before adding to the casserole. It reduces the chance of potato becoming marshy due to stirring and prolong cooking.

Ingredients:
1/4 onion, julienne
2 potatoes, cut into quarters
1 carrot, cut into chunks
3 skinless chicken thighs

Sauce:
1 tbsp light soya sauce
2 tsp oyster sauce
1 tbsp sugar (I like sweet sweet)
1/2 tsp dark soya sauce
About 100ml water

Directions:
1. Soak potato and carrot in salt water for about 10 minutes, drained.

2. Place potato, carrot and onion in a heat resistant bowl. Add 100ml of water into the rice cooker, then place the bowl in it and cook using the normal rice cooking mode. When the potato and carrot are cooked, set aside.

3. Wash and marinate the chicken thighs with 1 tsp light soya sauce and dash of black pepper.

4. In a non-stick pot, heat up a 1/2 tbsp of olive oil in medium low heat. Place the chicken thighs in and cook till the meat starts to turn white. Add in the sauce and water. When it starts to boil, pour in the cooked vegetables. When it starts to boil again, lower the heat and let it simmer till the meat soften. Stir in a tsp of starch mixed with 1 tbsp water towards the end of cooking, if you like a thicker gravy.
Serve hot with rice :)

Sunday, 18 November 2012

Happycall Japanese An-pan


Yield: 4x7cm buns

Ingredients:
100g bread flour
2 tsp raw sugar
1 tsp dry yeast
65g milk, warm
10g butter, soften
60g red bean paste

Direction:
1. Pour flour, raw sugar and yeast into a clean mixing bowl. Mix well.

Pour flour, sugar and yeast in a
mixing bowl.

2. Dig a well in the middle of the flour mixture, and pour in the warm milk. Stir to mix.

Pour warm milk to the middle
of the flour mixture.

3. When all the milk has combined with the flour, add in the softened butter. Continue to mix until all the butter has incorporated with the flour. Shape the dough into a ball and let it rest for 5 minutes.

4. When 5 minutes is up, knead the dough in the bowl for about 5 to 8 minutes, or until the dough is smooth and elastic. Shape the dough into a ball and sprinkle some water on the dough surface. Place in a big bowl and cover it. Let it proof in a warm environment for about 25 to 30 minutes, or till the dough size double.


Mix the flour, sugar and yeast up
using hand

Add in the butter when the milk
has been absorbed.


Knead for about 5 to 8 minutes
in the mixing bowl,.

Proofing in the mixing bowl.

After the proofing, the size double.

5. Press down the dough to release the trapped air. Roll the dough into a ball and cut into 4 portions.

Divide the dough into 4 portions

6. Take a portion of the divided dough and roll into a ball. Press down and roll the dough into about 10 cm in diameter. Allow the dough center to be thicker than the edge.

Roll the dough with the centre thicker
than the edge

7. Flip the dough over, so that the smoother side will be facing out when you wrap with red bean paste.
Squeeze a spoonful of red bean paste in the middle. Wrap up the dough and pinch to seal the opening.

Flip the dough after rolling out, with
the smoother side facing down.

Squeeze out the red bean paste
from the packet.

Add a spoonful of red bean paste
in the middle

Wrap up the dough.

Pinch the opening to seal.

8. Face the opening down and place on a parchment paper coated with butter in the HCP. When you finish the 4 breads, close the lid and start baking in medium low heat for about 8 to 10 minutes.  Then flip the bread over to heat the other side for another 5 minutes.  When the bread is cooked, the side of the bread will be hard and crispy.  And you can smell the nice aroma of the bread.

Bake in the HCP for 8 minutes on one
side, and the other side
for 5 minutes.

Baking is done!

9. Cool the bread down over a wire rack.
Serve with tea :)


Thursday, 15 November 2012

Mexican coffee buns with soya filling


Soya filling
Ingredients:
100g soya bean pulp or okra
10g butter
30g raw sugar

Heat all the ingredients in a non-stick pot till it forms a soft dry paste.


Stir and heat till the paste is dry

 
The soya bean paste

Divide the bean paste into 8 portions and shape into balls. Set aside.

Dough ingredients:

250g bread flour
35g raw sugar
3g fine salt
1 tsp dry yeast
135g low fat milk, warm
30g butter, softened
1/2 egg

Directions:

1. Place bread flour in a clean mixing bowl. Dig a well in the middle of the flour, pour in sugar and yeast. Add a few teaspoons of warm milk to the yeast to activate it. Let it stand for about 2 minutes.

Pour the yeast and some sugar
into the well.

Adding warm milk to the yeast and
sugar to activate the yeast.

2. Pour in the remaining warm milk and beaten egg, mix well. Start kneading the dough by using an electric hand mixer fits with dough hooks till smooth. This takes about 5 minutes.


Pour in the remaining milk and
beaten egg

Mix all the ingredients together
into a lump


3. Add in the softened butter, continue to knead till the dough become smooth and elastic. This may take about 5 to 10 minutes.

Kneading completes when the dough
is elastic and smooth.

4. Shape the dough into a ball and place in a container with a cover. Let it proofs in warm temperature for about 1 hour.

Cover the dough and let it
proof for 1 hour

5 To test whether the proofing is done, coat your index finger with flour and insert into the middle of the dough. If the hole does not close up, then the proofing is done. Otherwise, continue to proof for another 10 minutes and test again.
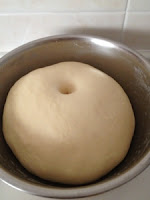
At the end of proofing, test with
your finger by poking a hole

6. Punch down the dough to release the air. Fold in the sides and roll it up into a ball. Divide the dough into 8 portions by using a dough cutter. Roll them into balls and rest for 10 minutes.


Press down the dough to release
the trapped air
Divide the dough into 8 portions

Shape the cut doughs into balls.


7. Use your palm to flatten a dough ball, flip it over and place a salted soy bean paste in it. Wrap the dough up and pinch the opening to seal tightly. Place the dough with the sealed end down on a tray. Leaving about 5 cm gap in between doughs. Place the tray in the oven set at 35 degree Celsius to proof for about 40 minutes.


Flatten the dough

Place a soya bean paste onto
the middle of the flatten dough

Pinched the opening to seal
tight

Meanwhile, prepare the coffee icing cream:


Coffee crust ingredients:
100g butter, softened
80g icing sugar
1 1/2 eggs, lightly beaten
1 tbsp instant coffee powder
1 tbsp hot water, to mix with coffee powder
100g self-raising flour

Direction:
1. Place softened butter in a mixing bowl. Whip the butter by using an electric hand mixer for about 2 minutes. Add in the icing sugar and continue to whip till well mix.

Mixing icing sugar to the butter

2. Pour in the beaten egg and continue to whip.

Adding beaten egg to the butter
cream

3. When the egg is well incorporated with the butter, pour in the coffee paste (premix the coffee powder with water). Mix well.
Dissolve the instant coffee
powder in hot water


Adding coffee paste to the
butter cream


Whip the coffee cream by
using a single whisk of the
mixer

4. Finally, add in the flour in a few batches. Mix well.


Mixing the flour to the coffee
cream in batches.

Stop whipping when sharp peaks
formed

The coffee cream after finish
whipping.

5. When done, scoop the coffee icing cream into a pipping bag fix with 5mm nozzle.

Scoop the coffee cream ino a pipping
bag

6. Keep the coffee icing cream in the fridge till ready to use.

To prevent the cream from oozing
out from the nozzle, clip a fastener
to the bag just before the nozzle

Icing & baking

1.When the dough proofing is done, take them out of the oven. Pipe coffee icing cream to cover the top of the bread dough.

Align the finished bread doughs
at least 5 cm apart.

2. Bake the bread in a preheated oven for about 15 to 20 minutes at 200 degree Celsius.

Almost finish baking.

Cool the bun before serving :)