Thursday, 27 March 2014

Potato Bacon Pie

A delicious pie with soft flaky crust and moist potato bacon filling.

Yield: 8 x 12cm pies

Filling Ingredients 
350~380g cooked potato 熟马铃薯
50g bacon bits 腌肉粒
2 tbsp yellow onion, chopped黄大葱粒
1 tbsp chopped carrot 胡萝卜粒
1 tbsp chopped capsicum 青椒粒
100ml fresh milk 鲜奶
1/4 tsp salt 盐
1/4 tsp black pepper 黑胡椒
Dash of seasoning powder, optional 调味粉,可免


Directions
1. Take about 400g of raw potatoes, peel and cut into large chunks. Rinse with salt water. Steam in a rice cooker for about 15 minutes, till soft.
将大约400g的生马铃薯去皮切块。浸泡盐水后,在电饭锅蒸15分钟至软。

2. Mash the potato which it is hot.
趁热把马铃薯压成泥。


3. Heat bacon bits over a parchment paper in a pot over medium high heat. Transfer the bacon out of the pot when slightly brown.
将腌肉粒置于防沾烤纸上,以中高火略煎至金黄,离锅,待用。

4. Heat up 1/2 tbsp of olive oil, stir-fry onion till frangrant. Then stir in carrot and capsicum.
在热锅中倒入1/2汤匙橄榄油,炒香洋葱粒后,再加入胡萝卜和甜椒粒。

5. When the vegetable slightly softened, pour the bacon bits and mashed potato in and mix.
当蔬菜有点软后,将腌肉粒和薯泥倒入混合。

6. Slowly add in the milk, stirring and watching the consistency. Adjust the milk quantity according to the consistency of the potato paste. 
Caution: too wet will result in a soggy crust after baking.
慢慢加进牛奶、视薯泥湿度调节牛奶分量。
注意:薯泥避免过湿,以免影响派皮脆感。

7. Add salt, black pepper and seasoning powder according to your taste.
适度加盐、黑胡椒和调味粉,拌匀。

8. Scoop out the potato filling and allow it to cool down.
盛出内馅,放凉待用。

Crust ingredients 
150g top flour 低筋面粉
100g frozen butter 冰奶油
1 egg yolk 蛋黄
1/4 tsp salt 盐
10g fine sugar 细糖
50g iced water 冰水

Direction
1. Mix flour, salt and sugar in a big mixing bowl.
将面粉、盐和糖倒进搅拌盆搅拌。

2. Add frozen butter to the flour. Cut the butter into coarse bits with a dough cutter.
将冰奶油加入,并以刮刀和面粉混合切成粗粒。


3. Add in egg yolk and iced water, stir into a dough using a pair of chopsticks.
加入蛋黄和冰水,并以筷子搅合成团。


4. Place the dough in a plastic bag and roll into an even dough. Place the dough in the fridge for 1 to 2 hour.
将面团装进槊料袋,轻轻整平, 放进冰箱1到2小时。

5. Remove dough from fridge and allow it to rest in room temperature for about 5 minutes.
将冷面团拿出冰箱后,稍等5分钟后,才开始操作。

6. Divide the dough into 2/3 and 1/3.
将面团分隔成1/3和2/3分量。

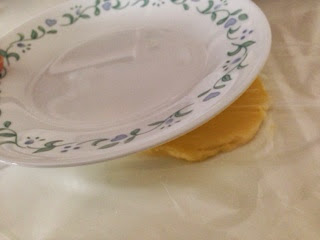
7. Take the 2/3 portion and further divide into 8 portions. Place the dough between two plastic sheets, and use a plate to press it into about 12 cm diameter round dough. Place the flattened dough into the mould with the aid of the plastic sheet.
If the room temperature is high, keep the rest of the dough in the fridge until needed.
取2/3分量的面团,分隔成8等份。取一小面团置于两张槊料纸之间,用一盘子将面团压成大约12cm直径圆片。利用槊料纸将面团片装进模。
如果室温较高,可将其余的面团收进冰箱,直到用到时才取出。



8. Scoop the filling into the mould to about 4/5 in height.
将薯泥填进模中,只需填到8到9分满就行。

9. Divide the remaining 1/3 dough into 8 parts. Roll into flat dough to cover the pie.
将剩余的1/3面团也分隔成9等份。用同样的办法压平,谱在派上。

10. Remove excess crust. Use a fork, press the edge of the pie to form patterns. Use a toothpick to poke a few holes on the crust.
整修完,用叉子将边缘压紧,并用牙签在表面戳几个洞


11. Brush with beaten egg.
刷上蛋液

12. Bake in pre-heated oven at 170 degree Celsius for about 40 minutes.
放进预热到170度Celsius的烤箱中烤40分钟,直到表面呈金黄为止。

13. Allow the pies to rest for about 5 minutes, before inverting the pies out of the moulds.
Remove the pie from the mould while it is hot for easy removal.
让热派饼先休息5分钟,才将派饼倒扣出来。
派饼需趁热倒扣才容易脱模。

12. Serve hot :)
趁热享用 :)


Monday, 17 March 2014

Rice Cooker Brown Sugar Bread 电子锅黑糖面包

Rice cooker bread does not have a golden crust like those baked in an oven.  However, it has a moist and soft bread texture which can last till the next day even after refrigeration.
This recipe makes use of the "keep warm" function of the rice cooker, helps to reduce the prolong proofing time by almost half.

电子锅面包虽然没有金黄的表面,但是其湿润的质地,仿佛像是加了汤种的面包。其“保温”功能也让发酵时间缩短大概一半。

Yield: 4 x 8cm buns

Ingredients 
180g bread flour 高筋面粉
20g top flour 低筋面粉
1/2 tsp instant dry yeast 即发干酵母
1/4 tsp salt 盐

30g dark brown sugar 黑糖
120g warm water (about 50 degree C)
          温水(大约50度C)
20g unsalted butter, softened
        无盐奶油,软化

Direction
1. Mix the flour, yeast and salt in a mixing bowl.
将面粉、干酵母和盐加入搅拌盆中拌匀。

2. Dissolve brown sugar in the warm water.
将黑糖溶在温水中。

3. Pour 3/4 of the brown sugar solution into the flour mixture. Stir to blend.
将3/4分量的黑糖水加在面粉混合料中。搅拌混均。
Adding the remaining brown sugar solution to the dough in a few times.
慢慢将剩余的黑糖水分几次加入面团,边搓边加。
Knead to form a dough.
将材料搓成团。

4. Transfer the dough to the work top and knead for about 10 to 15 minutes, till the dough is smooth.
将面团移到工作台上,继续搓10到15分钟,直到面团滑顺无粉粒为止。


5. Spread out the dough and apply the softened butter over it. Knead to blend in the butter.
将面团摊开,并将软化的奶油铺开。慢慢将奶油搓进面团中。

6. Knead and slam the dough against the work top for about 5 minutes till the dough becomes elastic and stretchable.
搓揉甩打大概5分钟,直至面团富有弹性和张力。


7. Pull down the sides of the dough and seal at the bottom. Place the dough in a lightly greased container. Spray some water over the dough, cover and place inside the rice cooker. 
将四周拉下,收口在底部的面团放进涂了油的盆中,喷些水,盖上盖子。再移到电饭锅中。


8. Switch on the "Keep Warm" mode for 3 minutes. Switch off the "Keep Warm" mode, and let the dough proof in the rice cooker for about 30 minutes, or till the dough double it's size.
开启“保温”功能3分钟。关闭“保温”功能后,让面团留在锅中做第一次发酵,大概需30分钟,直至面团发到两倍大。


9. To test whether the proofing is complete, poke your finger coated with flour into the dough. If the gap remains open, then the proofing is complete. Otherwise, allow another 10 minutes of proofing and check again.
测试面团是否发酵完毕,将涂了面粉的手指戳进面团,如果洞孔不关闭,代表发酵完毕。否则,让面团继续发酵10分钟后,再测试。

10. Sprinkle some flour over the dough and the work top. Invert the dough out, and flatten it to remove the trapped air.
在面团和工作台上撒些面粉后,将面团倒扣出来。将面团压平挤出汽体。


11. Divide the dough into 4 portions. Pull down the sides, and seal at the bottom into a ball. 
将面团分隔成4等份。将面团的四周拉下,收口在底部。


Lightly coat the dough with some flour, place in a container, and cover with a lid. Allow the dough to rest for about 15 minutes.
将面团轻抹上些面粉,以防沾粘,放进盆中盖上盖子,休面15分钟。

12. Lightly flatten the dough and shape into a ball shape. 
将面团略压平后,整形成圆形。

Place the dough in the rice cooker lines with a sheet of parchment paper.
将面团放入铺有防沾烘烤纸的电饭锅中。


13. Spray some water over the doughs, and turn on the "Keep Warm" mode for 3 minutes. After turning off, allow the dough to proof for about 30 minutes.
在面团上喷些水后,开启“保温”功能3分钟后关闭。让面团在锅中做最后发酵30分钟。

14. When second proofing has complete, turn on the "Cake Baking" mode to start baking. You may use the "Quick Cook" mode to bake if your rice cooker does not have "Cake" function. The "Quick Cook" mode may require two rounds of cooking to ensure thorough baking of the bread.
最后发酵完成后,开启“蛋糕”功能,开始烘焙。
如果没有烘焙功能,可用“快煮”功能。用“快煮”功能烘焙,可能需启动此功能两次,才能完全烤熟面包。

15. When baking complete, lift out the buns using the parchment paper.
烘焙完成后,借助烘焙纸帮你提出面包。
Allow the buns to cool on a wire rack before slicing :)
让面包冷却后才切片享用 :)