
Since the beginning of the previous Year of the Pig, I have tried using German cookie recipe to create cookie in the shape of the chinese zodiac character of that year. The coming Year of Tiger has posed difficulty in continuing my yearly cookie making "tradition".

Frankly, after shaping my first tiger face cookie, I knew I do not possess the skill and patience to continue making even a small batch of cookies.

Therefore, the next best thing I could do was to make use of the main colours of tiger skin to create pattern for the otherwise plain-looking German cookies. Another task was to find the easiest method to create the pattern. And after 3 attempts, I have finally found the most efficient method. Hurray 😃

Yield: 20 x 3⌀cm cookies
Ingredients
60g unsalted butter, softened
26g icing sugar
a little salt
56g plain flour plus/plain flour
44g potato starch
4g milk powder
some bamboo charcoal powder
some cocoa powder
red food dye
yellow food dye

Directions
1. Mix plain flour plus, potato starch, milk powder in a small bowl. Mix the flours before use. You can also sieve the flours.


2. Cream softened butter, icing sugar and salt in a mixing bowl till light and fluffy.


Take about 171g of original dough to mix with 3 drops of yellow food dye, and a little red food dye to create an orange or yellow dough. You can adjust the colour depending on your preference.


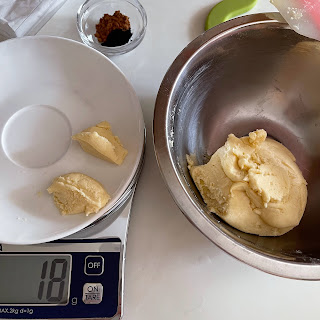
4. Keep the first original small dough covered. And take the other 9g original dough to mix with a little cocoa and bamboo charcoal powder to become the black dough. Do not over add the bamboo charcoal powder or the dough will become dry and difficult to shape.


6. Cut the plastic bag to expose the orange dough. Cut along the plastic bag nearer to the two longer edges, so you can flip open the plastic sheet. Later you need to flip back the plastic sheet while you roll flat the coloured strips over the orange dough.
7. Roll flat the original and black dough between two sheets of plastic. Use a plastic knife or spatula to cut narrow strips of dough,


Cover the dough with plastic sheet and lightly roll over the coloured strips to press them to the orange dough.


9. Arrange the shaped dough over a non-stick baking sheet or parchment paper.

Bake at middle rack of a preheated oven at 150℃ for about 18 to 20 minutes. Let the cookies stay in the oven for another 5 minutes to dry them up.


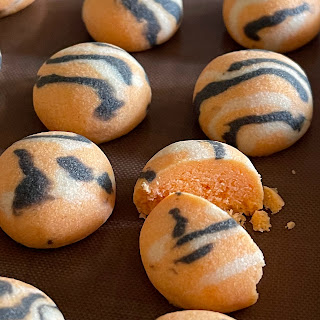


10. Let the cookies cool down over a wire rack. Enjoy these melt-in-your-mouth cookies slowly as they are painstakingly made 😍😜
If there are still leftover cookies, keep them in an air-tight container 🎁
Thanks for sharing wonderful article, i love to read this type of content keep writing grocery 4u franchise reviews
ReplyDelete