
Baked 10 tiger strips pattern buns filled with bak kwa and sweet coconut filling to usher the lunar year of Tiger. Not a perfectly drawn tiger skin pattern, but looking from far still have some degree of resemblance, hehe 😉

Bak kwa or BBQ pork or chicken jerky is a popular goody during Chinese New Year period. It is quite common to use it to bake buns. However, I find using pure bak kwa is too salty. So I added the bak kwa bits to some lightly sweetened grated coconut to give a milder yet delicious filling to the buns. The BBQ aroma of the bak kwa helped to give the grated coconut a faint BBQ aroma 😋

Video of the 🐯🥥buns
Yield: 10 small buns
Raw dough weight: 515g
Baking temperature: Preheat oven to 190℃, middle rack, bake at 180℃ for 8 minutes, reduce to 170℃ for 10 minutes, turn off heating and bake for 2 to 3 minutes.
Baked using Teka HLB840 oven with Temperature Surround feature which allows breads to be baked at a shorter duration.
Bak Kwa Coconut Filling
Below quantity made 370g which can be made into two batches of 10 buns each
Ingredients
10g organic coconut oil/mild flavour vegetable oil
25g raw sugar
20g fine sugar
15g hot water
1/4 tsp low sodium salt
250g grated coconut
3g glutinous rice flour
25g water for mixing with glutinous rice flour
90g bak kwa/honey BBQ pork or chicken jerky
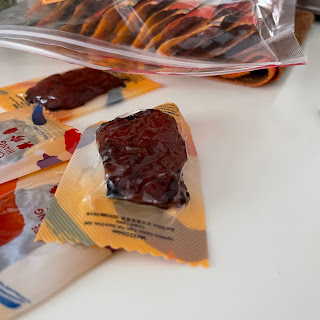 |
| vacuum packed mini bak kwa |
Directions
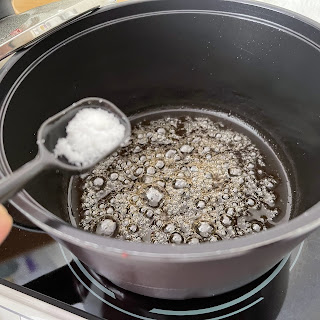
1. Heat coconut oil, raw sugar, fine sugar and 15g of hot water in a pot till it bubbles. Stir in the low-sodium salt.


4. Cut the Bak Kwa or honey pork/chicken jerky into bit size. Stir it to the grated coconut in the pot.


Milk Bun Dough
Ingredients
200g bread flour
10g spelt flour/superfine wholegrain flour
10g pumpkin powder/top/cake flour
30g raw sugar
1g instant dry yeast
40g natural yeast/sourdough, 100% hydration*
29g yudane dough^
130g low-fat milk, cold +
10g whipping cream +
25g cold water, to be added depending on dough condition
3g low sodium salt
20g unsalted butter, softened
Toppings
some egg white
some whipping cream
some bamboo charcoal powder


* 50g natural yeast can be replaced by 25g each of bread flour and water + 1/8 tsp instant dry yeast. Let the mixture stands for about 1 hour or more till double in volume, before use. You can also keep the mixture in the fridge overnight and thaw it for 1 hour before use.
^ 30g yudane dough is prepared by combining 16g of bread flour with 15g of very hot or boiling water into a sticky dough. Wrap the yudane dough in cling wrap, and cool down before use. Use a silicone spatula to scrape out the sticky yudane dough from the cling wrap.

+ 110g low fat milk & 10g whipping cream can be replaced by 120g fresh milk.
Directions
1. Knead the dough following your preferred method.
For my method, you can refer to my recipe Yudane Milk Bread. After kneading the dough to window pane stage,

shape the dough into a ball,

and keep in a plastic bag pre-coated with a thin coat of oil. Squeeze out most of the air, tie a loose knot, and keep in a second plastic bag.
Place the bag of dough in a big mixing bowl, cover with a lid, and store the dough in the fridge overnight to undergo cold fermentation. I let the dough keep in the fridge for about 14 to 16 hours.

2. In the next day, invert the dough with the plastic bag, and thaw the dough for about 1 hour in room temperature. Thaw the bak kwa coconut filling at the same time if you kept it in the fridge.


First, brush some egg white-whipping cream over the entire face of the shaped dough.

Next, use a spoon to apply streaks of egg white-bamboo charcoal to resemble the tiger skin strips.


8. Bake at middle rack of a preheated oven. Lower the temperature to 180℃ after closing the oven door. Bake at 180℃ for about 8 minutes, lower the temperature to 170℃ and bake for 10 minutes. Turn off the heating and bake for about 2 to 3 minutes.
You may have to observe the colour of the buns to determine the duration of each baking temperature setting. The goal is to achieve a golden hue to the crust.

9. Remove the tray of buns from the oven, and let them cool down a while before serving. Enjoy the yummy tiger strips buns 🐯🐯


No comments:
Post a Comment
I love seeing your comment and sharing it with other readers. Your comment would be published after moderation. Thank you :)