
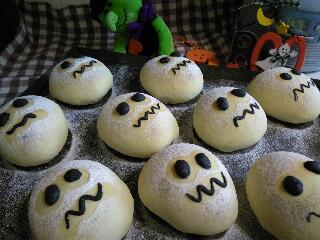
Adding some fun to baking, I turned some simple yam buns into a halloween theme bread. The decoration really took me quite a while as I am not a good sculptor. The slow proofing process of the natural yeast seems apt for this.
Raw dough weight: 459g
Yield: 9 buns
Ingredients
185g bread flour20g top/cake four
30g fine sugar
2g fine salt, about 1/4 tsp
20g beaten egg
80g natural yeast, 100% hydration
90g whole milk
20g condensed milk
90g whole milk
20g condensed milk
20g unsalted butter, softened
Click here to view growing natural yeasts using grapes.
Filling
240g sweet yam paste
40g steamed pumpkin chunks (optional)
Click here for sweet yam paste recipe

Directions
1. Feed natural yeast and use it within 3 hours after feeding.
2. Mix all the ingredients, except the unsalted butter, following the sequence listed.

Stir in one direction till all the ingredients combine into a dough that pulls away from the wall.

Cover and let it stand for about 20 minutes to allow the flour to absorb liquid.

3. Knead the dough into a smooth dough.
Click here for steps in kneading dough by hands.
Click here for steps in kneading dough by hands.


Shape into a ball.

4. Keep the dough into a plastic bag spray with a little oil. Squeeze out most of the air in the bag and tie a loose knot at the end.
Let the dough stand in room temperature for about 1 hour.

5. Double protect the dough with another plastic bag, place in big mixing bowl, cover with a lid, and keep in the fridge for overnight proofing.
I let the dough proofed for about 20 hours.


6. On the next morning, take out the dough, invert it, and let it returns to room temperature for about 60 to 90 minutes.

7. While waiting for the dough to thaw, divide the sweet yam paste into 9 equal portions, about 25g each.
As I have some leftover steamed pumpkin chunks, so I just wrapped it into the yam paste ball.


Cover and set aside.

8. Turn the dough onto a floured work top.

Deflate the dough and divide it into 9 portions.


If you're going to do decoration to the buns later, keep about 10g of the dough aside.

9. Roll the dough into balls, cover and rest for about 15 minutes.

10. While the "milk dough" is resting, knead about 1/4 tsp of bamboo charcoal powder to the 10g of dough.


Roll the charcoal dough into a long strip, and divide it into 9 portions.

From the individual dough, further divide into 3 portions to make the eyes and mouth. Set aside.

11. Roll the milk dough into a flat dough.

Flip over and place the yam ball from step 7 onto the dough.

Wrap up the milk dough to conceal the yam ball.

Face the sealed end down, and shape the dough into slightly oval shape. Rest the dough on a floured non-stick baking sheet.

12. Shape the charcoal dough into 2 eyes and a long strip.

Design your buns using the pairs of eyes and "mouths".

13. Spray some water over the tops, and proof in a closed, warm oven.
I switched on 50 degree Celsius for 2 minutes and off it.

Let the dough proof for about 90 to 120 minutes, or till the dough double in size.


14. Preheat the oven to 180° Celsius.
Cut out two cardboard to cover the eyes and month. Then sift some flour over the doughs.


15. After transferring the dough into the oven, reduce the oven temperature to 160°C and bake for 10 minutes.

Further reduce the temperature to 150°C and bake for another 12 to 15 minutes, or til the top slightly brown.

16. Let the buns cool down on a wire rack before enjoying 😋


No comments:
Post a Comment
I love seeing your comment and sharing it with other readers. Your comment would be published after moderation. Thank you :)