I usually would plan and bake some Halloween related cakes or buns during the past years. However, this year I didn't plan ahead and prepare the cake spontaneously. You could tell from the crudely done cake 😜 Anyway, its a good excuse for the cake to appear awful during Halloween, right?! The cocoa-milk steamed cake tasted delicious with the bamboo charcoal whipped cream sandwiched in between the two layers of cake 😋 My family, who do not fancy chocolate cake, enjoyed it surprisingly 😄
Yield: one 13cm round cake
Bamboo Charcoal Whipped Cream
Ingredients
80g whipping cream
8g icing sugar
1/4 tsp bamboo charcoal powder
some milk, cold
1/4 tsp vanilla extract
Directions:
1. Mix bamboo charcoal powder with cold milk into a paste. Set aside in the fridge.
2. Keep the equipment for whipping the cream in the freezer for about 15 minutes.
3. Pour cold whipping cream into the cold tall mixing cup and stands on an ice pack (optional).
Using this tall mixing cup and the balloon whisk of an hand blender really need very short duration to get that small quantity of cream whipped up using the turbo speed. I think should be around 3~4 minutes.
4. Blend the whipping cream using the Turbo speed for about 30 seconds to reach soft peak.
Add in the icing sugar,
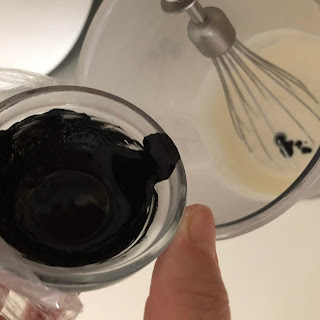
bamboo charcoal paste,
and vanilla extract,
continue to beat at Turbo speed for about 5~10 seconds, or till the cream starts to thicken. Use the low speed dial, about Speed 1 to 2, to beat till the cream reaches firm peak.
Keep the cream in the fridge till needed.
Cocoa-Milk Steamed Cake
Ingredients
Using 55g Omega 3&6 eggs
All ingredients in room temperature
2 egg whites
45g caster sugar
2 egg yolks
70g top flour
50g milk
10g condensed milk
10g rice bran/mild flavour vegetable oil
5g cocoa powder
1g bamboo charcoal powder
some hot water
Directions
1. Mix cocoa powder and bamboo charcoal powder in a small saucer.
Add some hot water to make it into a smooth paste. Set aside.
2. In a clean, dry and oil-free mixing bowl, beat egg whites till frothy. Add in the 45g fine sugars in 3 lots, continue to beat till reaching firm peak stage. Blend in the egg yolks, one at a time.
Stop beating when the yolks are well incorporate with the egg whites. Less than 15 seconds.The beaten egg is ideal if it can hold its shape for more than a minute.
3. Sieve in 1/3 of the top flour, and mix briefly.
Mix milk, condensed milk and rice bran oil in a small cup. Mix in 1/2 of the milk mixture briefly.
Alternating between the remaining flour and milk mixture, mix the batter till it becomes smooth.
Flour → milk mixture →flour
4. Heat up about 100ml of water in an 18cm pot at medium-low temperature. Place a low steamer's rack in the pot.

Pour a small amount of the batter, just enough to cover the base of the cake pan.
Use the tip of a chopstick to "pull up" some batter at the edge to create the "over-flow" effect.
Steamed at medium low heat for about 3 minutes, or till the cake solidified.
5. While waiting for the milk-cake to steam, mix the cocoa-charcoal paste to the remaining batter. Set aside.
6. Remove the milk-cake from the pot. While the cake is still hot, use the tip of a teaspoon to cut out a figure.
7. Pour the cocoa batter over.
Level the cake.
8. Steam the cake at medium-low heat for about 5 minutes,
reduce the temperature to low, and steam for about 20 minutes,
or till the cake is cooked through.
9. Drop the cake with the pan thrice to a kitchen towel.
Let the cake cool down in the pan for about 5 minutes.
Lift the cake out of the pan, allow it to cool down over a wire rack.,
Cut the cake across into 2 layers.
Spread the cold bamboo charcoal whipped cream on the inner face of the cake.
Stack the upper layer over. Refrigerate the cake for about 3 to 4 hours before cutting. Enjoy 😋


No comments:
Post a Comment
I love seeing your comment and sharing it with other readers. Your comment would be published after moderation. Thank you :)